1 × Waveshare ESP32-S3-Touch-AMOLED-1.75C (round)
Requiredboard
Main board or device for this build.
A working Muse Gadgets: ESP32 Device SDK (Full UI) build on Waveshare ESP32-S3-Touch-AMOLED-1.75C (round), paired to your Muse account and ready for first prompts.
You need the board and any build-specific accessories before flashing or pairing.
Main board or device for this build.
Must carry data, not just charge. Most flashing problems are charge-only cables.
Optional, for cordless use. Buy the battery SKU or check the Waveshare wiki for the cell size before ordering one separately. Battery size: https://www.waveshare.com/esp32-s3-touch-amoled-1.75c.htm
Print it yourself, or upload the STL to a print service such as Craftcloud or JLC3DP; small parts usually cost a few dollars plus shipping.
Muse gadgets pair with your account by using a private SDK token.
Create a token at gadgets.muse.ai > Account > SDK tokens (https://gadgets.muse.ai/settings/sdk-tokens). It starts with mgst_. For this ESP32 build, set CONFIG_GADGET_SDK_TOKEN="mgst_YOUR_TOKEN" in build-muse-waveshare-s3-175c/sdkconfig after the board build command has created that file, then run the build command again. idf.py menuconfig > ESP32 Device SDK > Muse Gadgets SDK token is the interactive alternative. Never commit the real token or paste it anywhere public.
The board needs the Muse ESP32 firmware configured with your SDK token.
Give your coding agent the build brief at https://www.hackshop.dev/build/waveshare-esp32-s3-touch-amoled-1-75c/build.md. Tell it to keep the token private, use mgst_YOUR_TOKEN as the placeholder, and find the serial port before flashing. On macOS it should run ls /dev/cu.usbmodem* /dev/cu.usbserial*; on Linux, ls /dev/ttyACM* /dev/ttyUSB*; on Windows, use Device Manager to find the COM port, then run commands in the ESP-IDF shell.
Install ESP-IDF v6.0.1 and only the esp32s3 target for this board. Muse's ESP32 README verifies macOS and Linux. Windows is not documented by the Muse SDK; if you use it, install ESP-IDF v6.0.1 with Espressif's Windows installer and run commands in the ESP-IDF shell. Clone the Muse Gadget SDK, run tools/muse/board.sh build s3 once to create build-muse-waveshare-s3-175c/sdkconfig, set CONFIG_GADGET_SDK_TOKEN="mgst_YOUR_TOKEN" in that file, run tools/muse/board.sh build s3 again, then flash. If flashing cannot connect, hold BOOT, tap RESET, then release BOOT.
git clone -b v6.0.1 --recursive https://github.com/espressif/esp-idf.git ~/esp/esp-idf-v6
~/esp/esp-idf-v6/install.sh esp32s3
. ~/esp/esp-idf-v6/export.sh
git clone https://github.com/facebookincubator/muse-gadget-sdk
cd muse-gadget-sdk/esp32
tools/muse/board.sh build s3
printf '\nCONFIG_GADGET_SDK_TOKEN="mgst_YOUR_TOKEN"\n' >> build-muse-waveshare-s3-175c/sdkconfig
tools/muse/board.sh build s3
ls /dev/cu.usbmodem* /dev/cu.usbserial* 2>/dev/null || ls /dev/ttyACM* /dev/ttyUSB* 2>/dev/null
tools/muse/board.sh flash s3 PORTPairing links the freshly flashed board to your Muse account.
In the Muse app, turn on Settings > Devices > Developer mode, then Settings > Devices > Add Device (+). Pick MuseGadget-XXXXXX and press the top button when the screen or edge status breathes blue. Green means connected. Status meanings: orange = ready for setup, blue breathing = press the button, blue = joining Wi-Fi and connecting, green = connected, yellow blinking = reconnecting, purple = unpaired, red blinking = error. Hold the button for 5 seconds to reset pairing.
The printable files keep the gadget visible, stable, and easy to reach.
Print the stand from the STL, or send the STEP/STL to a print service. Test fit before leaving the device unattended.
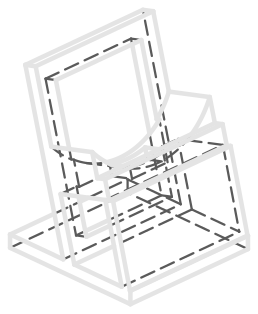
Read fab.json before ordering; print-service materials and tolerances vary.
A physical agent body needs to sit safely, keep the cable clear and leave controls reachable.
Put the board in the printed desk stand. Route the USB-C cable through the slot or open edge, power it, and check that the buttons and display are reachable.
A first prompt proves the device is paired, reachable, and useful for the project.
# Build: Waveshare ESP32-S3-Touch-AMOLED-1.75C (round) as a Muse gadget

## Goal
A working Muse Gadgets: ESP32 Device SDK (Full UI) build on Waveshare ESP32-S3-Touch-AMOLED-1.75C (round), paired to your Muse account and ready for first prompts.

## Hardware
- [Waveshare ESP32-S3-Touch-AMOLED-1.75C (round)](https://www.waveshare.com/esp32-s3-touch-amoled-1.75c.htm) x1 (required, board): Main board or device for this build.
- [USB-C data cable](https://www.amazon.com/s?k=USB-C%20data%20cable) x1 (required, part): Must carry data, not just charge. Most flashing problems are charge-only cables.
- [3.7 V Li-ion cell with MX1.25 connector](https://www.amazon.com/s?k=3.7V%20Li-ion%20cell%20MX1.25%20connector) x1 (optional, part): Optional, for cordless use. Buy the battery SKU or check the Waveshare wiki for the cell size before ordering one separately. Battery size: https://www.waveshare.com/esp32-s3-touch-amoled-1.75c.htm
- [Printed desk stand](https://www.hackshop.dev/cad/waveshare-esp32-s3-touch-amoled-1-75c/desk-stand.stl) x1 (optional, printed): Print it yourself, or upload the STL to a print service such as Craftcloud or JLC3DP; small parts usually cost a few dollars plus shipping.

## Shopping list (ask before buying)Personal, non-commercial use with your own Muse account. A token can be linked to at most 50 devices. You may not put it in any device you sell, advertise, or list publicly or in a marketplace or app store; other distribution needs Meta's written permission. Provided as-is; Meta can change, withdraw or revoke access at any time. Read terms.